How to Connect a Custom Domain to Your Pixelesq Site

What Connecting a Domain Actually Does
Connecting a custom domain tells the internet that visitors typing yourbrand.com should see your Pixelesq site. Under the hood, this is two things: DNS records point traffic at Pixelesq's servers, and ownership verification confirms you actually control the domain before Pixelesq issues an SSL certificate for it.
You need access to your domain registrar (wherever you bought the domain, like GoDaddy, Cloudflare, Namecheap, or Google Domains) to add DNS records. You do not need to transfer your domain to Pixelesq. Your domain stays where it is. You just point it at Pixelesq.
Who Can Connect a Custom Domain
Custom domains are available on every Pixelesq plan, including the Free plan. There is no paywall on connecting your own domain. You can add multiple domains to a single project if you own several.
Step 1: Open Domain Settings
In your Pixelesq dashboard, click Settings in the sidebar, then select the Domain tab. If this is your first domain, you will see an empty state explaining the process.
[Screenshot: Settings page with the Domain tab highlighted]
Step 2: Add Your Domain
Click the Connect button in the header. A dialog titled "Add a new domain" opens with a single input field.
Enter your domain in the format yourbrand.com. Do not include www. or https://. If you paste in www.yourbrand.com, Pixelesq automatically strips the www. prefix for you.
Click the submit button. If the domain is available, Pixelesq creates the domain record and it appears in your list. If the domain is already connected to another Pixelesq project, you will see an error saying the domain is taken.
[Screenshot: Add a new domain dialog with domain entered]
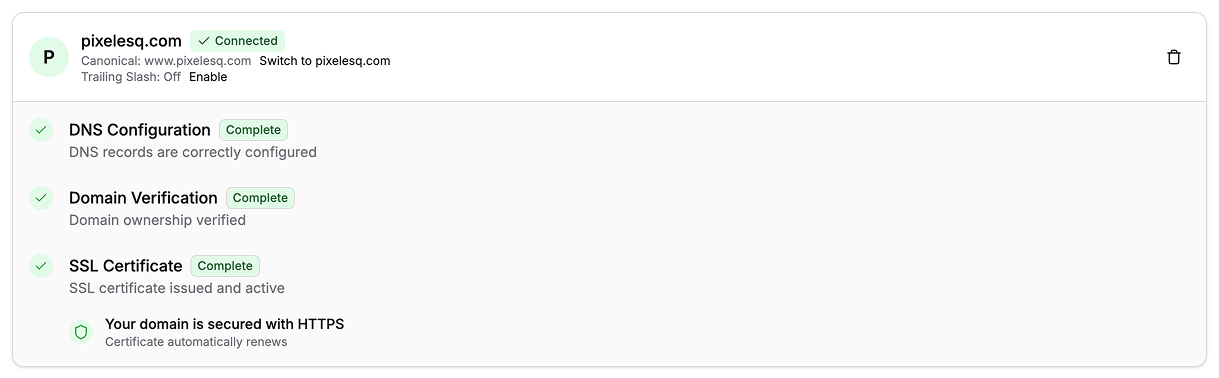
Step 3: Understand the Three-Step Panel
After adding your domain, Pixelesq shows a three-step configuration panel:
DNS Configuration - points your domain at Pixelesq's servers
Domain Verification - proves you own the domain
SSL Certificate - enables HTTPS (automatic after verification)
Each step has a status: green means complete, amber means pending. You work through them in order.
[Screenshot: Three-step panel showing DNS Config (amber), Verification (amber), SSL (amber)]
Step 4: Add the DNS Records at Your Registrar
Pixelesq displays the exact DNS records you need to add. You will see two records:
TypeName / HostValueA@76.76.21.21CNAMEwwwcname.vercel-dns.com.
Copy these values and add them at your domain registrar. The exact steps vary by registrar, but the concept is the same for all of them. If you use GoDaddy, Cloudflare, or Namecheap, see our dedicated guide on setting up DNS records at each provider.
The A record at the root (@) tells the internet where your apex domain (yourbrand.com) lives. The CNAME record for www points the www version at the same place.
After adding the records, save them at your registrar. You do not need to click anything in Pixelesq yet. The DNS status updates automatically once propagation completes.
[Screenshot: Pixelesq showing the A and CNAME records with copy buttons]
Step 5: Verify Domain Ownership
Once DNS is configured, Pixelesq shows a TXT record for ownership verification. This is a one-time check that proves you control the domain.
The TXT record looks like:
Type: TXT
Name: _vercel
Value: (a dynamic string shown in the Pixelesq UI)
Add this TXT record at your registrar the same way you added the A and CNAME records. Then come back to Pixelesq and click Check Verification.
If the record is in place and propagated, Pixelesq marks verification as complete. If not, wait a few minutes and try again. DNS propagation can take from a minute to 48 hours depending on your registrar and the TTL of your records.
[Screenshot: TXT verification record with Check Verification button]
Step 6: SSL Certificate Issues Automatically
The moment your domain is verified, Pixelesq automatically issues a free SSL certificate for it. Your site is served over HTTPS with no manual setup. The certificate renews automatically before expiration.
You will see the SSL step turn green with a message confirming the certificate is active. No further action needed.
Step 7: Choose Canonical (www vs Root)
Pixelesq connects both yourbrand.com and www.yourbrand.com at the same time. You choose which one is canonical, meaning the one your site actually displays.
By default, www.yourbrand.com is canonical. Visitors who type yourbrand.com are automatically redirected to www.yourbrand.com. If you prefer the root domain as your public URL, click Switch to yourbrand.com in the domain settings. Visitors to either version end up on the canonical one.
Canonical choice matters for SEO. Pick one, stick with it, and use it consistently across your marketing, social profiles, and backlinks.
Optional: Enable or Disable Trailing Slash
Once your domain is verified, you can enable or disable trailing slashes on your URLs. A trailing slash means your URLs look like yourbrand.com/about/ instead of yourbrand.com/about. This is a small technical preference that is off by default.
Pro Tips
Connect the domain before launching content. If you build your site on the default Pixelesq subdomain and then switch to a custom domain, you lose any backlinks and search rankings pointing at the old URL. Connect the domain first.
Cloudflare is the fastest DNS. If you use Cloudflare as your DNS provider (free), changes propagate in seconds instead of hours. Worth considering if you make frequent DNS changes.
Use the same canonical everywhere. If your canonical is
www.yourbrand.com, link towww.yourbrand.comin your social profiles, email signatures, and marketing. Mixed canonicals split your SEO signal.Keep your default Pixelesq URL working. Your
yourproject.sites.app.pixelesq.aiURL stays active even after you connect a custom domain. Useful for testing and for teammates who need quick access.Pixelesq connects both www and root automatically. You do not need to add both manually. One add creates both entries.
Troubleshooting
"Domain is taken" error when adding: The domain is already connected to another Pixelesq project (possibly yours, on a different project). Go to the other project and remove the domain first. If you do not recognize the error, contact support.
DNS step stuck on amber after adding records: DNS propagation can take time. Wait 15 minutes and refresh the page. If it still shows amber after an hour, use a DNS lookup tool like dnschecker.org to confirm your records are visible globally. If not, check at your registrar that you saved them correctly.
Verification fails repeatedly: Make sure the TXT record name is exactly _vercel (with the underscore) and the value matches exactly what Pixelesq shows. Some registrars auto-append your domain to the name, which is fine. Others require you to include the full path. If in doubt, check your registrar's documentation on TXT records.
SSL certificate taking longer than expected: SSL issues automatically within a minute or two of successful verification. If it is stuck for more than 10 minutes, try removing the domain and re-adding it. The re-add triggers a fresh certificate request.
Site loads on default URL but not custom domain: This is usually a DNS issue, not a Pixelesq issue. Check that your A and CNAME records are correct and have propagated. Also verify you are visiting with the correct protocol (https, not http) once SSL is active.
FAQ
Can I use a subdomain like blog.mycompany.com with Pixelesq?
Yes. When adding a domain, enter the full subdomain (e.g., blog.mycompany.com) in the dialog. For subdomains, you only need a CNAME record pointing the subdomain at cname.vercel-dns.com., not an A record. Pixelesq shows the correct record type based on what you entered.
Do I need to transfer my domain to Pixelesq?
No. Domain transfer is a completely separate process that moves ownership between registrars. Pixelesq only needs you to point your DNS records at its servers. Your domain stays at your current registrar, and you continue to manage renewals and WHOIS there.
Will my email stop working if I connect my domain to Pixelesq?
No, as long as you leave your MX records alone. MX records control where email is delivered, and Pixelesq does not touch them. You only add A, CNAME, and TXT records for the website. Email continues to work through whatever provider you use (Google Workspace, Microsoft 365, etc.).
Can I preview my site on the custom domain before going live?
There is no separate staging URL for custom domains. Once the domain is connected and verified, your site is live at that domain immediately. To preview changes before they reach visitors, keep your site in draft mode or use the editor preview, then publish when ready.
Does Pixelesq charge for SSL certificates?
No. SSL certificates are free on all plans, automatically issued, and automatically renewed. You never see a bill for SSL and never need to renew manually. This is standard across all Pixelesq plans including Free.
What happens to my site if I let my domain registration expire?
Your Pixelesq site keeps running, but no one can reach it through the expired domain. The DNS records become invalid, visitors see errors, and search engines eventually deindex the URL. Renew your domain at your registrar before expiration to avoid downtime. Pixelesq cannot renew your domain for you because the domain is registered with a third party.


