How to Create a Contact Form in Pixelesq

Quick Answer
Go to Forms in your sidebar, click Create Form, choose Manual or AI mode, add your fields, save, then embed a form section on your page and publish.
What You Need
A Pixelesq account with an active project
At least one page where you want to embed the form
Create a New Form
In your project dashboard, click Forms in the sidebar. Click the Create Form button.
A dialog opens with two creation modes:
Manual: Enter a form name and start with default fields (Full Name, Email, Message). You'll customize them in the editor.
Create with Pixel Agent (AI): Enter a form name, select a Form Type from the dropdown, and optionally describe your form. Pixel Agent generates all the fields for you.
AI Mode: Form Type Presets
When using AI mode, you can choose from these form type presets:
Contact Form
Lead Generation Form
Demo Request Form
Newsletter Signup
Feedback Form
Event Registration
Job Application
Intake Form
Survey Form
Support Request
Other
Add a Brief Description to help the AI understand your specific needs. For example: "Contact form for a marketing agency with name, email, phone, company, budget range, and a message."
You can also set a Redirect URL to send users to a thank-you page after submission.
[Screenshot: Create Form dialog showing the AI mode with Form Type dropdown and Brief Description field]
Add Fields to Your Form
After creating your form, you'll land in the form editor with a left sidebar (schema) and a right panel (live preview).
If You Chose Manual Mode
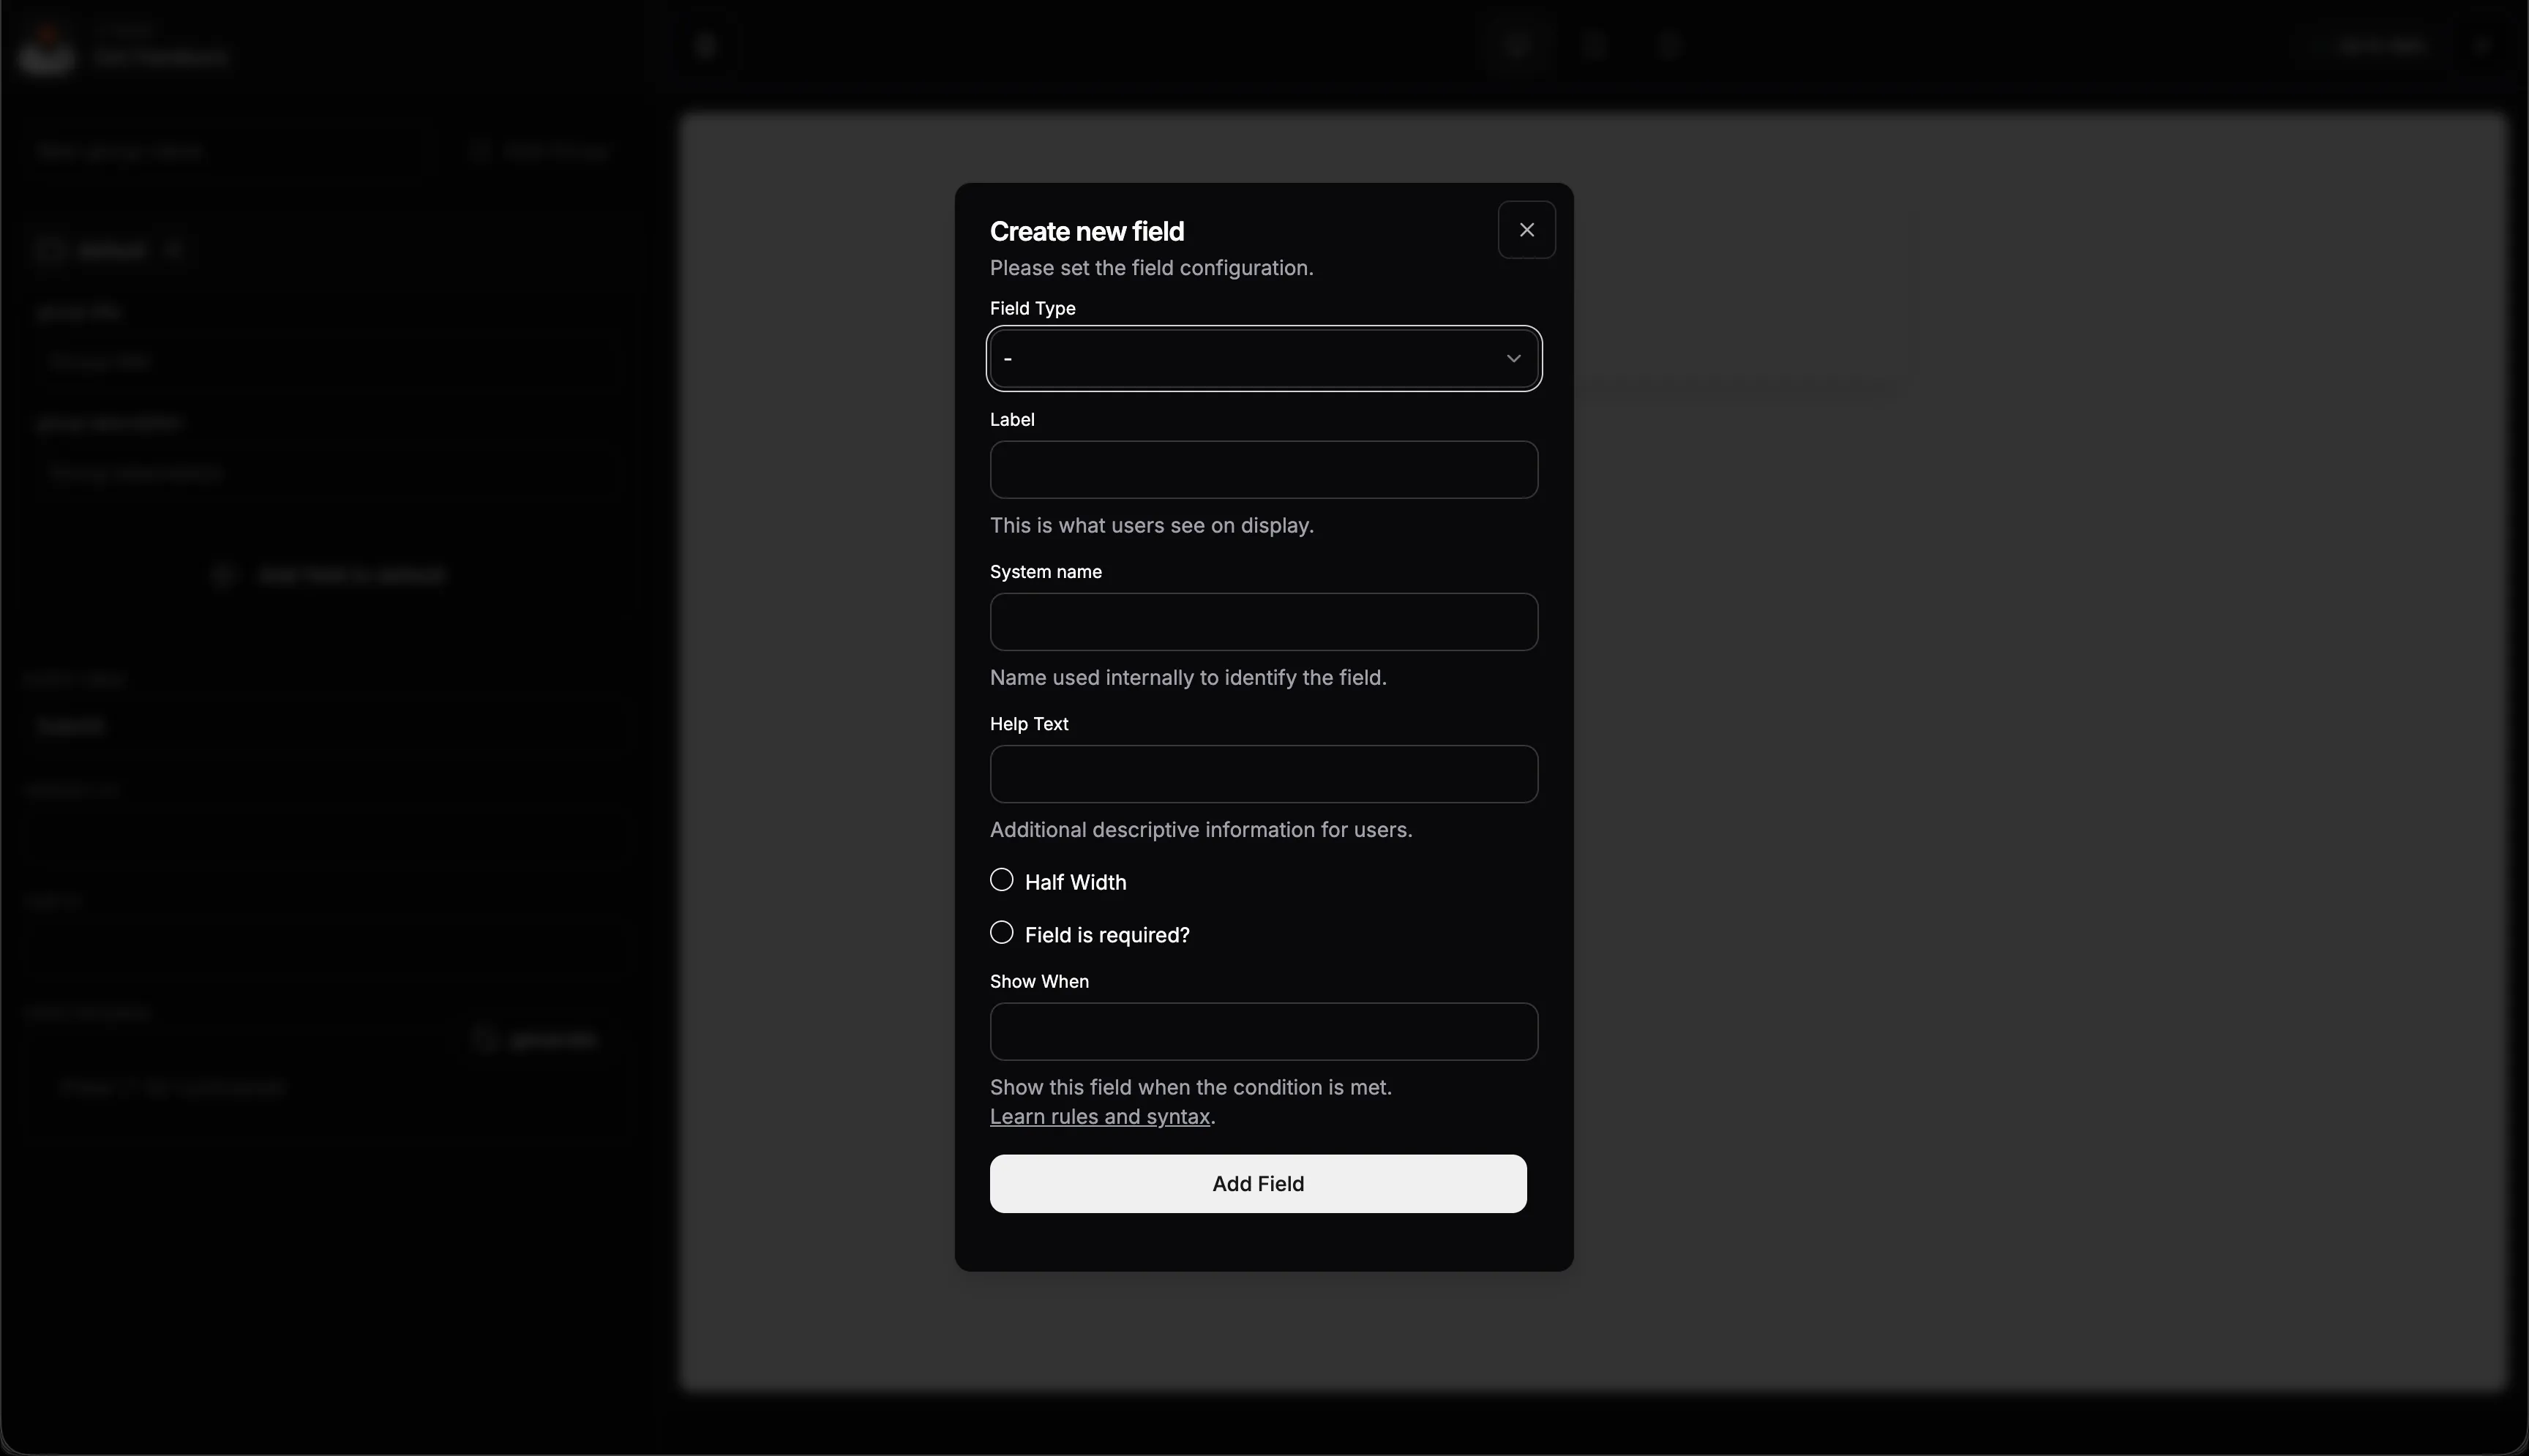
Your form starts with three default fields: Full Name (text), Email (email), and Message (textarea). Open the Form Field Schema Manager to add, edit, or remove fields.
For each field, you can set:
Label: What visitors see (e.g., "Company Name")
Name: Internal field name in snake_case (e.g., "company_name")
Type: One of 8 supported types (see below)
Required: Whether the field must be filled in
Half Width: Display two fields side by side (great for First Name + Last Name)
Help Text: A hint shown below the field
Options: Comma-separated values for select and multi-select fields
Supported Field Types
Text - Single line text input
Textarea - Multi-line text (for messages, descriptions)
Email - Validated email input
Phone - Phone number input
Number - Numeric input
Checkbox - Boolean toggle (e.g., "I agree to terms")
Select - Single-choice dropdown
Multi-select - Multiple-choice dropdown
If You Chose AI Mode
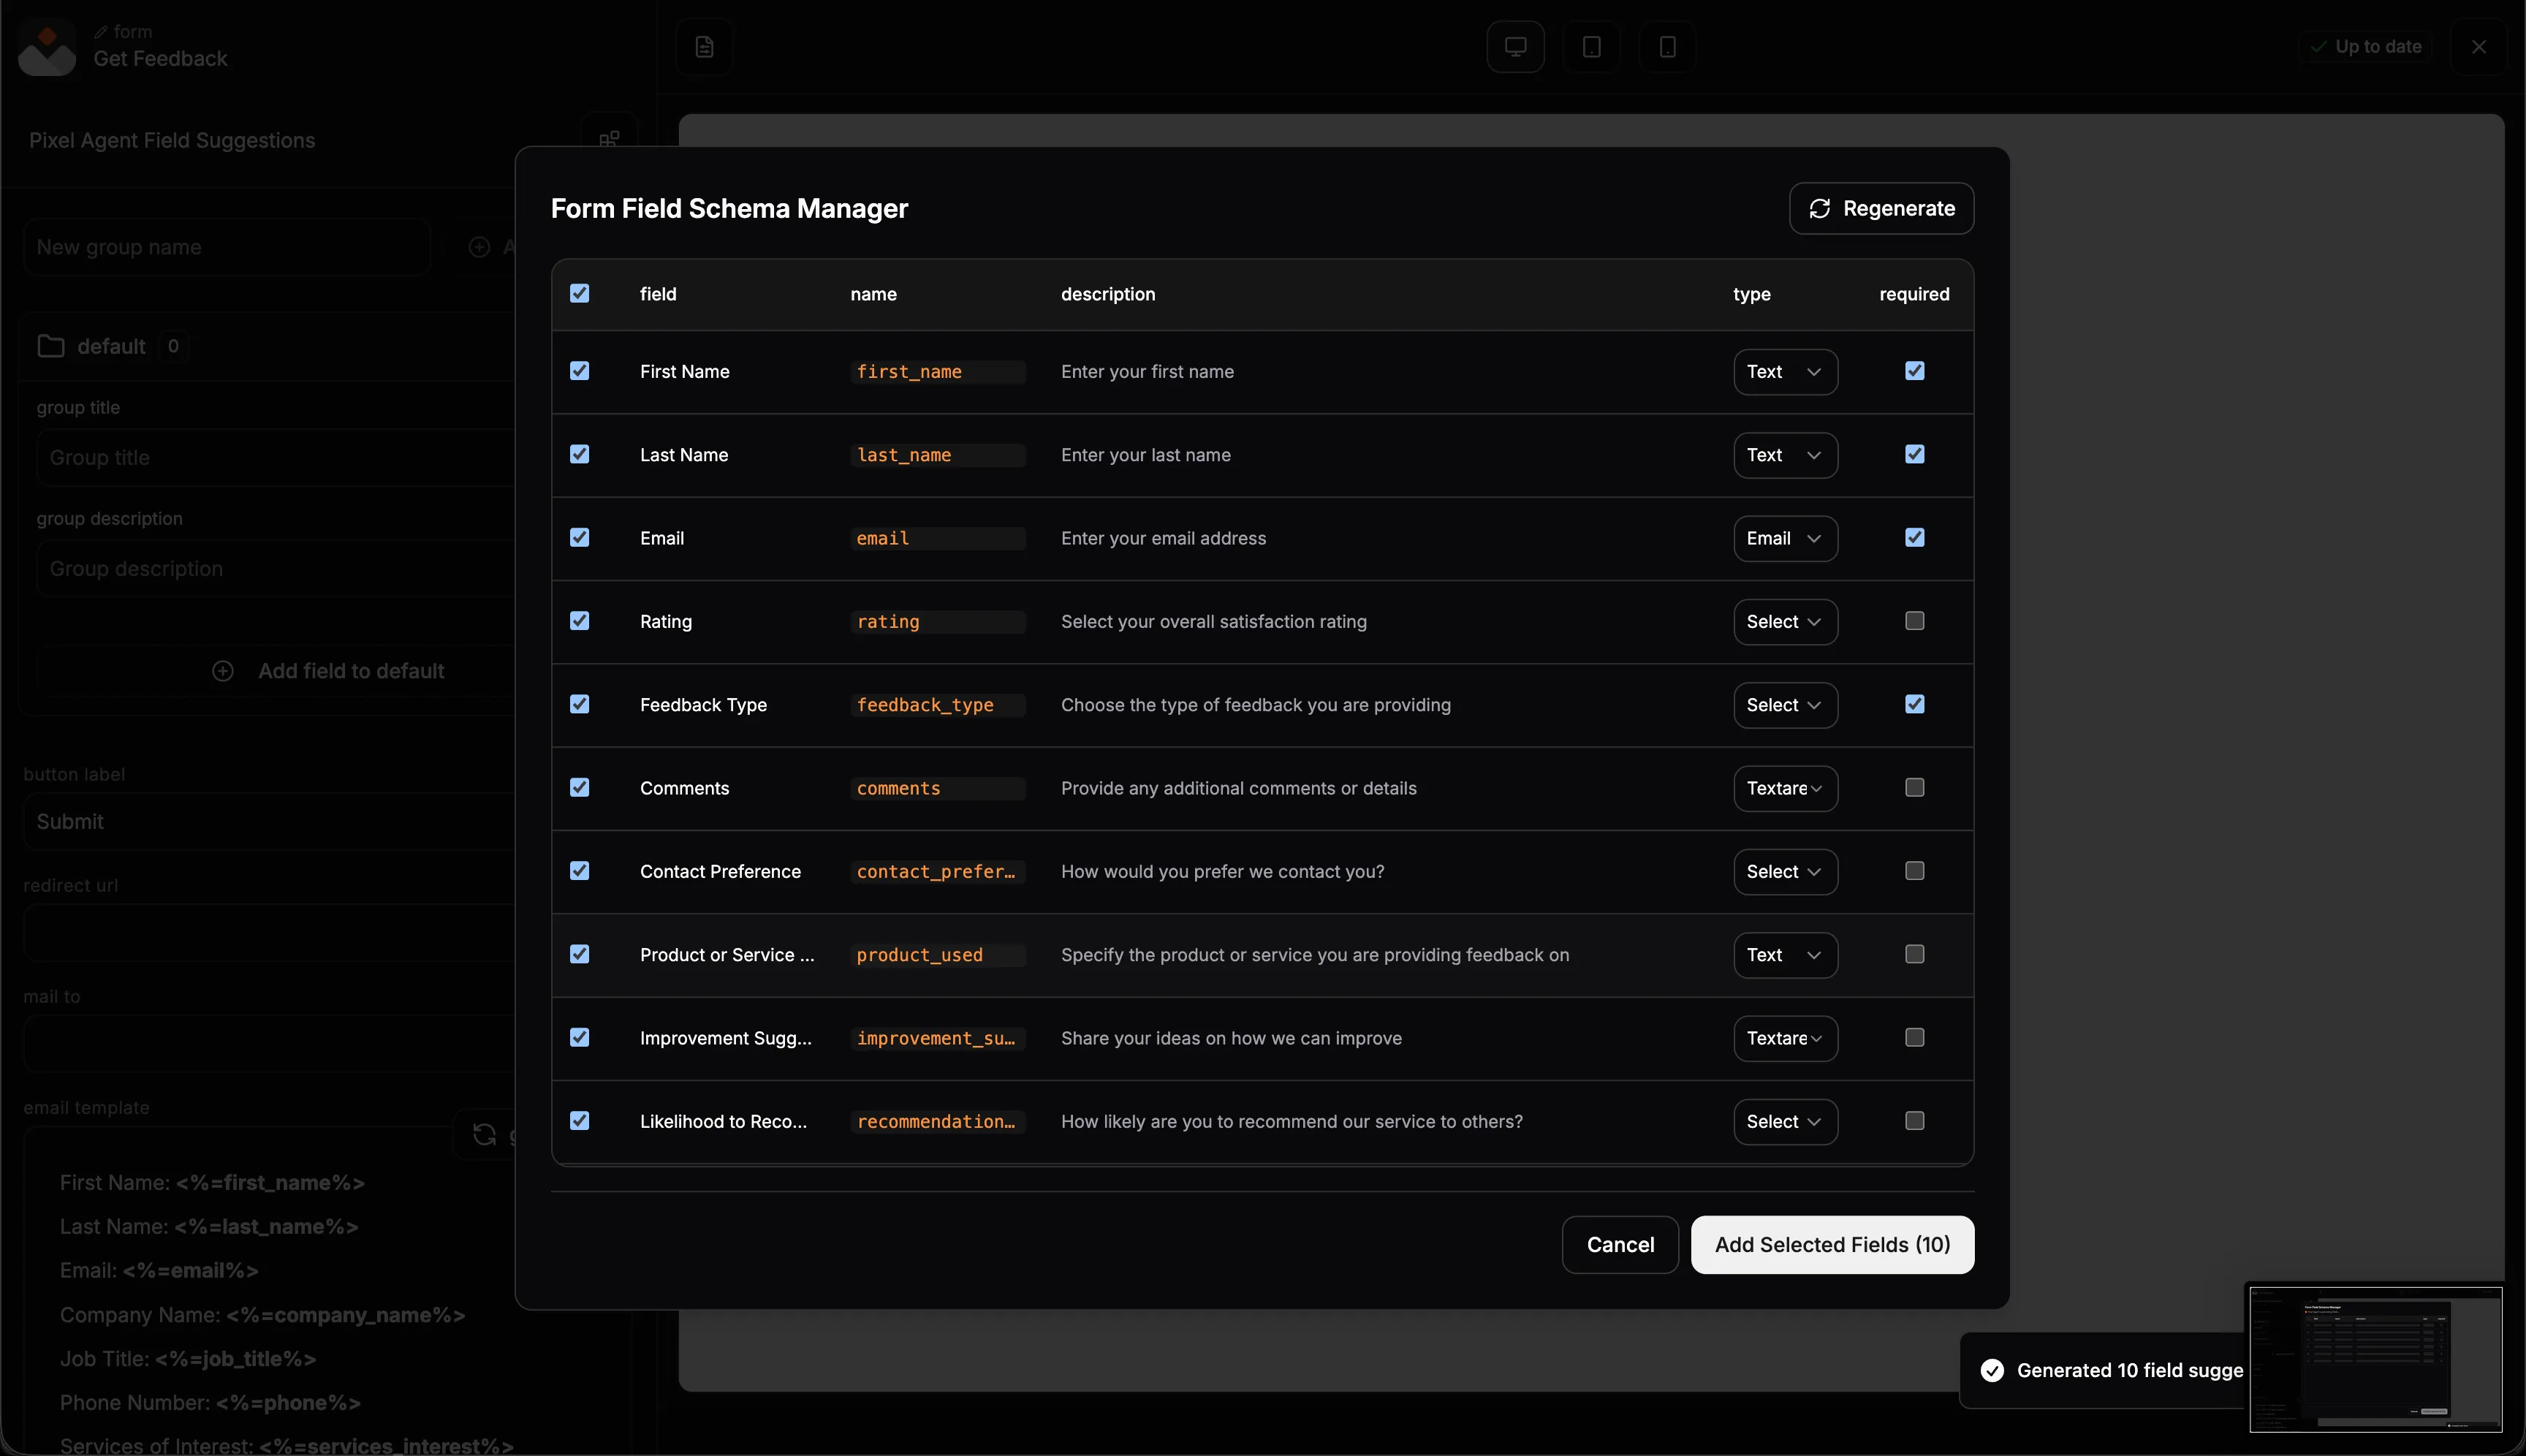
Pixel Agent generates a set of suggested fields based on your form type and description. You'll see a table with checkboxes where you can:
Select or deselect individual fields
Double-click any field to edit its label, name, or help text inline
Click Regenerate to get a fresh set of suggestions
Click Add Selected Fields to apply your choices
AI-generated forms typically include 6-12 fields with the right types, labels, and validation pre-configured. For contact forms, it always includes essentials like name, email, and a message field.
[Screenshot: Pixel Agent field suggestions table with checkboxes and inline editing]
Configure Form Settings
Click the settings icon in the form editor to configure:
Form Name: Update the display name
Submit Button Label: Customize the button text (default: "Submit")
Redirect URL: Send users to a thank-you page after submission (optional)
Embed the Form on a Page
Go to the page where you want the form. Open the page editor and click Add Section. Browse to the Form section group and choose a layout:
SimpleForm: Clean, minimal form layout with supporting text above
FormInCard: Form fields inside a card alongside supporting content
After adding the section, find the Form field in the section settings. Select your form from the dropdown. The section pulls in all your fields and renders them with your site's theme.
[Screenshot: Page editor with form section added and form selected from dropdown]
Publish and Test Your Form
Publish your page. Visit the live site and submit a test entry. Then check your dashboard under Forms, select your form, and switch to the Submissions tab.
The submissions table shows all responses with dynamic columns matching your form fields. It supports infinite scroll, column visibility toggles, and column resizing.
[Screenshot: Submissions tab showing test entry with dynamic columns]
Pro Tips
Use half-width fields for First Name + Last Name or Name + Email side by side. It looks cleaner and saves vertical space.
Add help text to fields like "Budget Range" or "Project Timeline" to reduce confusion and improve completion rates.
Set up a webhook to get instant notifications in Slack or email when someone submits. Go to Settings → Webhooks to set this up.
Duplicate forms for variants. Right-click any form in the list and select "duplicate" to create a copy. Useful for "Contact Us" vs "Request a Demo" variations.
Keep it short: Forms with 3-5 fields convert significantly better than long forms. Only ask for what you truly need.
Try AI first: Even if you want to customize heavily, starting with Pixel Agent saves time. Generate the fields, then edit them to your liking.
Troubleshooting
Form isn't showing on the page: Make sure you selected your form from the dropdown in the form section settings. If the dropdown still shows "pq-form" or is empty, reselect your form and save.
Submissions aren't appearing: Test on the published page, not the editor preview. Check that all required fields are filled in when testing. If submissions still don't appear, try clearing your browser cache.
Form styling doesn't match my site: Form sections inherit your project's active theme. If the styling looks off, check that the correct theme is applied to the page under page settings.
AI field generation isn't working: Make sure you provided a form type or description. The AI needs at least a form type to generate relevant fields. If it's still not working, try the Regenerate button to trigger a fresh generation.
FAQ
Can I add a contact form to any page in Pixelesq?
Yes. Pixelesq has dedicated form sections (SimpleForm and FormInCard) that you can add to any page. Create your form once, then embed it on as many pages as you need by adding a form section and selecting your form from the dropdown.
Where do form submissions go?
All submissions are stored in your Pixelesq dashboard. Go to Forms, select your form, and switch to the Submissions tab. You'll see a table with all responses, dynamic columns for each field, and support for infinite scroll. You can also set up webhooks to forward submissions to Slack, email, or any external tool.
Can I get notified when someone submits a form?
Yes. Set up a webhook in Settings → Webhooks to send form submissions to Slack, email services, or any tool that accepts webhooks. Pixelesq fires a form.submitted event with the full form data every time someone submits.
Can AI build my form for me?
Yes. When creating a form, choose the "Create with Pixel Agent" mode. Select a form type from 11 presets (Contact, Lead Gen, Demo Request, Newsletter, and more), add an optional description, and Pixel Agent generates all the fields with proper types, labels, and validation. You can then customize any field in the editor.
What field types does Pixelesq support?
Pixelesq supports 8 field types: text, textarea, email, phone, number, checkbox, select (single-choice dropdown), and multi-select (multiple-choice dropdown). Each field can be marked as required, set to half-width for side-by-side layout, and given help text for additional context.


